How to set up OpenSolaris environment for Image Packaging System tutorial on OSdevcon '08

by:
Michal Pryc (michal.pryc [At sun.com)

Wednesday, June 25th 2008; 14:30-17:30

Menu:
1. Information
2. Instructions how to install Sun Studio and CBE on your already existing OpenSolaris 2008.05
3. Using VirtualBox
4. Troubleshooting

1. Information

This tutorial shows how to create packages and repositories on the OpenSolaris platform with Sun Studio and Common Build Environment.

2. Instructions how to install Sun Studio and CBE on your already existing OpenSolaris 2008.05

Few steps to install Sun Studio and Common Build Environment on OpenSolaris box.

Those little steps will explain how to install Sun Studio and Common Build Environment on top of OpenSolaris 2008.05. Please note that some of those instructions normally should be different, but little bugs, which currently exists caused need for those changes in this tutorial.

Why you will need this?
The Sun Studio together with CBE will allow to build lot's and lot's of new packages/software to your lovely OpenSolaris and if you have a little knowledge you might want to create your own packages and share them with other people!

What you will need?
1. Internet Access.
2. Few cups of coffe/tee, since this will take a while, depending on your connection speed.
3. Good mood, as this was tested Today and may be different in couple of weeks, so if something will break don't panic! You have ZFS snapshots, so you will not break your system :-)

I) UPDATING YOUR SYSTEM
First you need to fully update your OpenSolaris 2008.05. Without this, probably things will not work, so to fully update your system please follow those steps as standard user:

$ pfexec pkg refresh

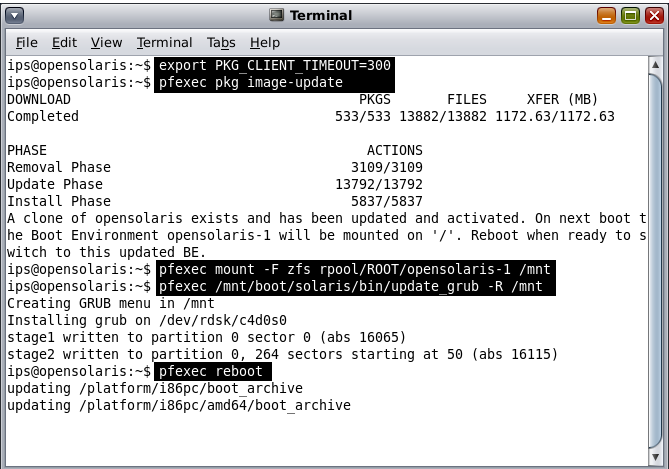
After this step you should follow those commands (as shown on below picture):

$ export PKG_CLIENT_TIMEOUT=300

$ pfexec pkg install SUNWipkg

$ pfexec pkg image-update

The below steps are related to the bug described HERE and MUST be done, otherwise you will NOT be able to boot to the updated OpenSolaris.

$ pfexec mount -F zfs rpool/ROOT/opensolaris-1 /mnt

$ pfexec /mnt/boot/solaris/bin/update_grub -R /mnt

$ pfexec reboot

The below screenshot, shows the actual steps. The black-marked commands are the ones which you should type (before this please remember to type pkg refresh) :)


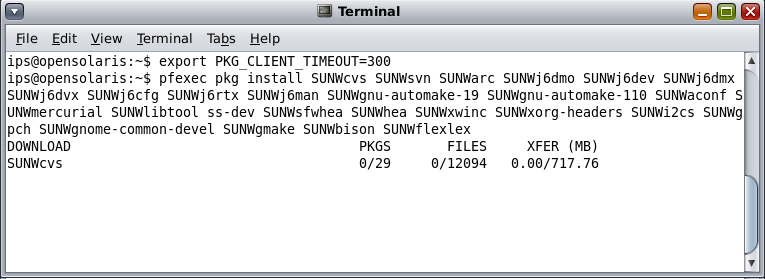
II) INSTALLING REQUIRED PACKAGES
Those steps will install all required packages

$ export PKG_CLIENT_TIMEOUT=300

$ pfexec pkg install SUNWcvs SUNWsvn SUNWarc SUNWj6dmo SUNWj6dev SUNWj6dmx SUNWj6dvx SUNWj6cfg SUNWj6rtx SUNWj6man SUNWgnu-automake-19 SUNWgnu-automake-110 SUNWaconf SUNWmercurial SUNWlibtool ss-dev SUNWsfwhea SUNWhea SUNWxwinc SUNWxorg-headers SUNWi2cs SUNWgpch SUNWgnome-common-devel SUNWgmake SUNWbison SUNWflexlex

The below picture is actual screenshot from the above operation:


III) INSTALLING COMMON BUILD ENVIRONMENT (CBE)
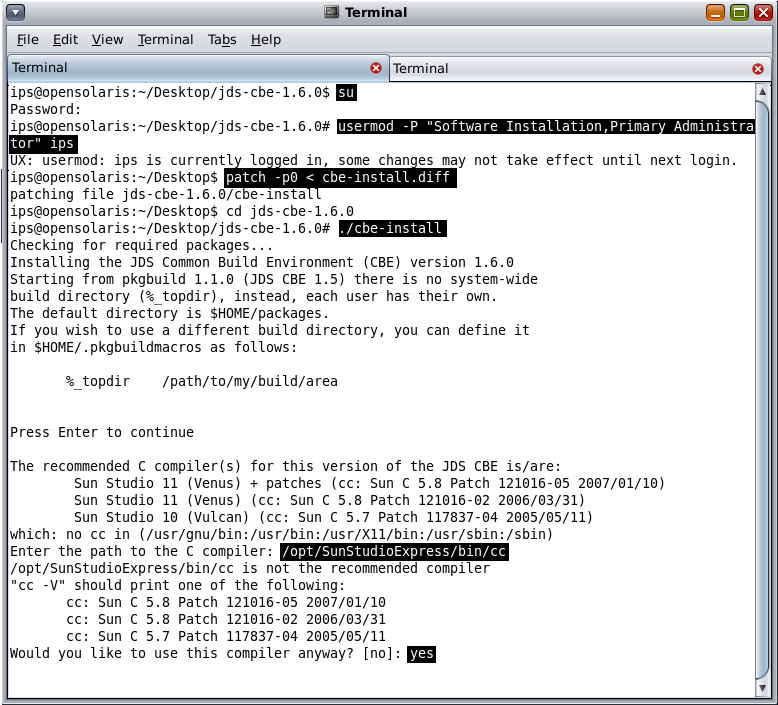
The first thing you need to do is to add the "Software Installation" profile for your user, to do so, please follow the commands, replacing USERNAME with your actual username:

$ su

$ usermod -P "Software Installation,Primary Administrator" USERNAME

Secondly you need to get CBE sources from HERE.
Then unpack:

$ bunzip jds-cbe-1.6.0-i386.tar.bz2

$ tar -xvf jds-cbe-1.6.0-i386.tar

Now you need to apply one small patch, so please download it and place in the directory one level up from jds-cbe-1.6.0 directory, so simply stay in the directory where you have been unpacking jds-cbe-1.6.0-i386.tar.bz2.
To apply this patch, please type the following command:

$ patch -p0 < cbe-install.diff

If this will not work, you can download patched cbe-install script and replace the one from the jds-cbe-1.6.0 directory.
Now just go to the jds-cbe-1.6.0 directory:

$ cd jds-cbe-1.6.0

and install stuff:

$ ./cbe-install

You will get few questions, so for all yes/no, please answer yes. For the question about patch to the C compiler, please type the following path:

/opt/SunStudioExpress/bin/cc

All those steps are visible on the screenshot:


That is it!

3. Using VirtualBox

VirtualBox allows to run prepared for this workshop OpenSolaris operating system. It can be run inside your existing Windows, Linux or Solaris. This steps will take depending on the computer from 10 up to 30 minutes.
To have itrunning please follow the steps:

1. Download and install the proper VirtualBox version: VirtualBox download page
2. Get the OpenSolaris.vdi image (you will need about 6GB of free space)
3. Open VirtualBox
3a. In the "File->Virtual Disk Manager" add the OpenSolaris.vdi image.
3b. In the "Machine->New", create Solaris machine selecting OpenSolaris.vdi as an disk image.
3c. Run the newly created Virtual Machine
4. LOGIN/PASSWORD: ips/ips root/passwd

4. Troubleshooting

If something will go wrong during installation of packages via pkg(1), and you will hit similar stacktrace to the one shown below, simply add the package name to the pkg install command by hand and it should go further.
This is related to bug 2229